This article presents the influence of the applied method used for removing the varnish coat on the corrosion resistance of the car body sheet. The tests were carried out on samples prepared from factory-painted car body elements with pearlescent, metallised and acrylic varnish. Removal of the varnish coat was performed by sandpaper grinding, glass bead blasting, disc blaze rapid stripping, soda blasting and abrasive blasting with plastic granules.
By Darius Ulbrich [1]; Jakub Kowalczyk [1]; Arkadiusz Stachowiak [1]; Wojciech Sawczuk [2]; and Jarosław Select [1]
[1] Institute of Machines and Motor Vehicles, Poznan University of Technology, 60-965 Poznan, Poland
[2] Institute of Transport, Poznan University of Technology, 60-965 Poznan, Poland
The average thickness of the factory-painted coating depending on the type of lacquer ranged from about 99 to 140µm. On the other hand, after removing the varnish, the thickness of the protective zinc coating ranged from 2 to 12.7µm. The highest values of the zinc coating were obtained for samples in which the varnish was removed by the method such as soda blasting and abrasive blasting with plastic granules. For these two methods of surface preparation, the damage to the zinc layer protecting the steel against corrosion is the smallest and the percentage of zinc in the surface layer ranges from 58% to 78%.
The final stage of the research was to test the samples after removing the varnish coat in a two-hour exposure to the corrosive environment in a salt spray chamber. Samples with the surface prepared by grinding with sandpaper reached the level of surface rusting Ri 5, while in the case of soda blasting and the use of plastic granules, no corrosion centers were observed on the surface of the car body sheet.
1. Introduction
The construction of car bodies as well as repair methods have changed over the years. This is mainly due to ecological reasons and the desire to reduce the weight of the vehicle by using high-strength steels, which results in a lower emission of exhaust gases to the environment. High-strength steels, aluminum and composites for more expensive vehicles are used for the construction of the car body. Gestamp is one of the manufacturers of car body elements who conduct research in the field of steel in the construction of vehicle bodies and machine parts. These tests include hot stamping of steel as well as the evaluation of this process for the corrosion resistance of the car body sheet.
When steel is used, it is also necessary to protect its surface against corrosion. This is possible thanks to the use of anodic and cathodic coatings produced at the vehicle production stage. As a result of this process, a layer is created that protects the steel structure against corrosion during the operation of the vehicle. The zinc layer is often a coating protecting steel against corrosion. However, the processes of applying the remaining layers of varnish on car bodies have changed over the years, adapting to the prevailing market trends.
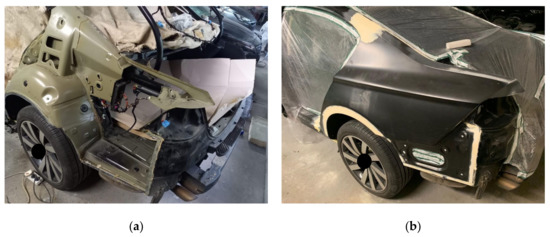
During the use of the vehicle, there are situations in which the vehicle’s body becomes damaged. In this case, the continuity of the coating applied to the car body sheet is broken due to the collision or repair process of the vehicle body. At the stage of renovation of the car body, it is necessary to prepare the surface before painting. It is important to minimise the interference with the coating protecting the steel against corrosion. All damage of this layer must be repaired, which generates additional costs. Errors at the stage of renovation of adhesive coatings result in the formation of corrosion centers, which affect not only the visual aspect of the car body but also its durability. An example of a vehicle whose body was damaged and required repair is shown in Figure 1.
Figure 1. View of the vehicle body (a) after removing the damaged panel, and (b) after installing a new element and applying a putty coating on the joints.
Corrosion resistance tests of steel covered with a zinc coating under various conditions of machine elements and motor vehicles have been conducted for many years. The main directions of research in this area focus on increasing the corrosion resistance of elements operating in aggressive environments. In the case of motor vehicles, there are three types of body corrosion: perforation corrosion, cosmetic corrosion and edge corrosion. Amirudin et al. presented cosmetic corrosion of zinc-coated and painted automotive materials and found that the main mechanisms responsible for damage to vehicle coatings are degradation by cathodic delamination, anodic undermining, mechanical delamination or a combination of these mechanisms.
Moreover, it was found that the main factor causing perforation corrosion is not the type of coating applied to the car body sheet, but its weight. Protection of the edges of car body sheets against corrosion is important because these are usually places where the corrosion process begins.
A separate group of research on the phenomenon of steel corrosion is the study of welded joints of car body sheets, in which the structure changes and protective coatings are damaged, leading to the corrosion process.
Dosdat et al. conducted a cyclic corrosion test for aluminised, galvanised (GI), and galvannealed (GA) coatings after hot stamping. The main conclusion of this research is that hot-stamped aluminised coatings do not offer the required cathodic corrosion resistance in cut-edge corrosion conditions. However, in the case of the tests presented in the article, only surface corrosion was found. Fan et al. found that the most commonly tested for anti-corrosion properties are standard coatings according to procedures such as the salt spray test, cyclic corrosion tests and electro-chemical tests. One of them was also performed by the authors of the article. Nevertheless, the use of coated hot-stamped steel in automotive vehicles is very recent. It is therefore important to use bare steel with some treatments, as well as to evaluate these corrosion-resistant properties of steel.
The main goal of the research presented in the article was to assess the impact of the method of removing the varnish layer on the corrosion resistance of the car body sheet. Proper protection against corrosion of the vehicle body sheet is a significant problem that occurs during the repair of car bodies. To remove the varnish coat, sandpaper was used (a method mainly used in body shops) as well as other methods: soda blasting, glass bead blasting, blasting with plastic granules and disc blaze rapid stripping. Corrosion tests in the salt spray chamber were carried out on steel samples cut from the car bodies. The surfaces of the samples were visually assessed for the degree of surface corrosion. The research presented in this article allowed for solving a significant technological problem in the form of appropriate anti-corrosion protection of the vehicle body at the stage of its renovation.
READ MORE:
2. Materials and methods
2.1. Samples preparation, coating thickness and surface parameters measurement
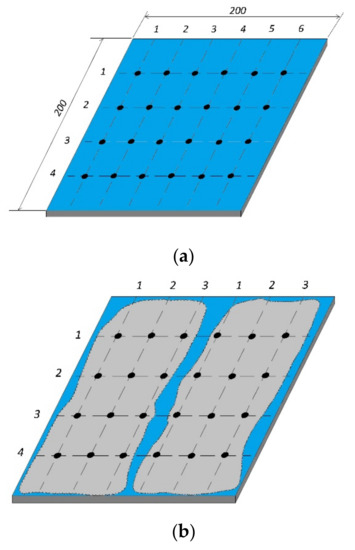
The research used parts of modern car bodies (cars produced in 2019 and 2020). However, the varnish coatings were prepared in various ways. Samples with pearlescent (blue); navy blue metallic and white acrylic varnish were used. Samples of equal size were cut out from a vehicle body (200mm × 200mm rectangular fragments). A diagram presenting the shape and size of samples as well as the distribution of measurement points is shown in Figure 2. In Figure 2b, two areas of different methods of surface preparation (coating removal process) are shown, i.e., the left area after soda blasting, the right area after sandpaper P80 grinding. The distances between the measurement points were 25 mm (measurement line 1–6 and two measurement lines 1–3) and 50mm (for measurement points 1–4). The distance of the point from the edge was 25mm.
Figure 2. Schematic view of the sample (dots—measuring points) (a) before varnish coat was removed, and (b) after varnish coat was removed.
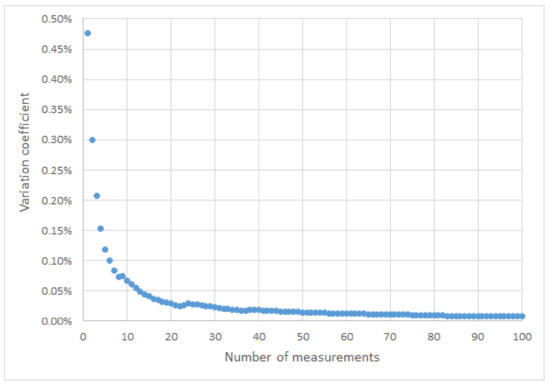
In the next step, it was checked whether the coatings applied to the sheet were original, i.e., made by the vehicle manufacturer during their production stage. Before starting the measurements, the number of measurements at one point and the number of measurement points were determined for all types of tested elements. One hundred measurements were made at one point and then the relationship between the variation coefficient and the number of measurements was determined:
where σ is standard deviation value for the measurements; ?ś? is an arithmetic mean value for the measurements; n is number of measurements. Based on the results (Figure 3), the number of repetitions of measurements in points out of 10 was determined.
Figure 3. Change of the variation coefficient depending on the number of measurements.
Thickness measurements were performed using the Karl Deutsch KD2050 leptoscope (Karl Deutsch, Wuppertal, Germany). The accuracy of the measuring instrument is equal:
After the measurements, the varnish coat was removed from all the tested samples. This operation reflected the repair performed in the conditions of body repair shops. An exemplary view of the selected samples after removing the varnish coat is shown in Figure 4. The following methods of removing the varnish coat were used:
-
sandpaper P80 and the electric oscillating machine MetaboSXE 425 TurboTec (P80 marking, Metabo, Nurtingen, Germany),
-
glass bead blasting,
-
abrasive blasting with the use of plastic granules Type II (UREA) (named granules),
-
disc blaze rapid stripping,
-
soda blasting (named soda).
Figure 4. View of the samples after removing the varnish coat using the glass bead blasting; (a) sample with acrylic varnish, (b) sample with metallised varnish.
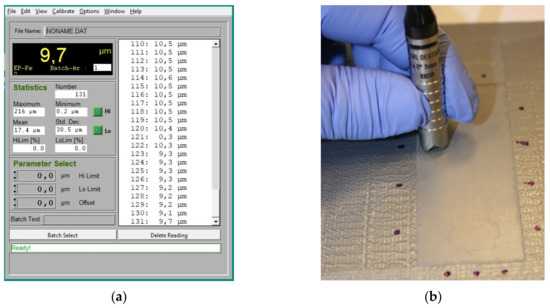
In the next step of the experiment, the measurement of the coating thickness was repeated in order to determine the thickness of the remaining zinc layer. The view of the measurement panel and the leptoscope during the tests is shown in Figure 5.
Figure 5. View of the measurement panel; (a) the KarlDeutsch KD2050 Leptoscope and (b) while measuring the thickness of the coating after removing the varnish layer.
An important parameter from the point of view of adhesion of the coating to the body of the motor vehicle is the appropriate roughness of the steel surface. This parameter should be obtained at the stage of the repair process of the body of the motor vehicle. Therefore, after removing the varnish layer, the surface roughness profile was tested using the Carl Zeiss Jena ME-10 measurement gauge (Carl Zeiss AG, Oberkochen, Germany). In addition, for selected samples, an analysis of the surface structure after removing the varnish in multiple approximations was also performed (SEM S-3400N microscope examination, Hitachi, Krefeld, Germany). The corrosion resistance of the car body sheet after bodywork repair will be particularly influenced by the residue of the zinc coating. Therefore, measurements of the chemical composition of the surface of car body sheets were carried out. The parameters of the surface roughness profile, the view of the surface of the samples after the removal of the varnish layer, as well as the information on the zinc residues on the car body sheet surface will allow to determine which method of removing the layer is optimal in terms of the thickest zinc layer.
2.2. Test in Salt Sprey Chamber
Corrosion resistance tests were carried out in the Haida HD-E808-60 salt spray chamber. The works were carried out in accordance with PN-EN ISO 9227: 2012. A sodium chloride solution was prepared with the pH of the salt solution equal to 7. The lowest value of the spraying overpressure (70 kPa) and the temperature (45°C) were determined in accordance with the standard. Such parameters were selected due to the lack of a varnish coat on the tested samples and the potential high susceptibility of the sample surface to brine and the formation of corrosion points. The samples were placed in the Haida HD-E808-60 chamber at a 20° angle from the vertical direction. Then, they were exposed from the side of the coating removal area to the action of salt spray for a period of two hours. This is the shortest exposure time to the salt spray effect included in the standard.
After two hours of exposure to salt spray, the samples were taken out of the chamber, set aside for one hour, then gently rinsed with a stream of clean cold water and dried. In next step, it was observed whether any corrosion changes occurred on their surface. The results in the form of photos of samples with corrosion areas are presented in the figures in the following chapters of the article.
In order to verify the surface condition of the samples, the areas with the highest degree of corrosion centers were selected and assessed on the basis of an approximation using a microscope. The sample surfaces presented in this way were compared to the standards included in PN-EN ISO 4628-3–Evaluation of degradation of coatings—Designation of quantity and size of defects, and of intensity of uniform changes in appearance—Part 3: Assessment of degree of rusting. This standard contains information from another standard (ISO 8501-1) describing the formation of rust (corrosion) on uncoated steel surfaces.
3. Results
3.1. Coating thickness with lacquer
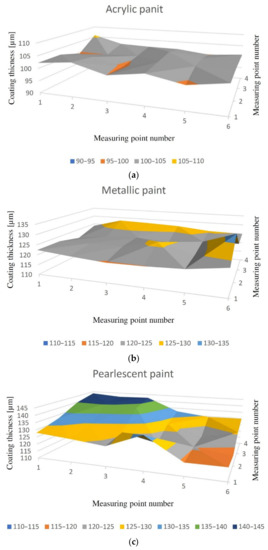
It was found that all of the prepared samples had a similar thickness of varnish coating and the measurements did not indicate any previous repair. The obtained results were similar to the thickness of the coatings presented in ‘Zieba-Palus, J. Examination of the variation of chemical composition and structure of paint within a car body by FT-IR and Raman spectroscopies‘. For white acrylic varnish, the average thickness of the coating was 102µm, while the smallest and highest thickness was 99 and 106µm, respectively. For metallised (navy blue) varnish, the average thickness of the coating was 124µm, while the smallest and largest thickness was 120 and 133µm, respectively. For the pearlescent (blue) varnish the average thickness of the coating was 129µm, while the smallest and largest thickness was 117 and 144µm, respectively. The coating thickness distribution for exemplary samples of each type of varnish is shown in Figure 6.
Figure 6. Measurement results of the varnish coat of samples for each type of paint; (a) acrylic varnish, (b) metallised varnish, (c) pearlescent varnish.
3.2. Coating thickenss without varnish layer
Based on the coating thickness measurements (after removing the varnish layer), significant differences between the applied methods were found. The biggest difference was observed for glass bead blasting. For the acrylic lacquer, the minimum thickness was 2.83µm and the maximum was 11.2µm. In the case of metallised varnish, the difference in thickness for glass bead blasting was also the highest of all the methods and amounted to 5.65µm. For the pearlescent lacquer, the greatest differences in thickness were recorded for granules and equaled 0 to 8.4µm. A more important variable than the differences in thickness was its distribution around all surface of the sample. The smallest thickness for all three types of samples was recorded for the surface prepared with P80 sandpaper; slightly greater thickness remained after disc blaze rapid stripping.
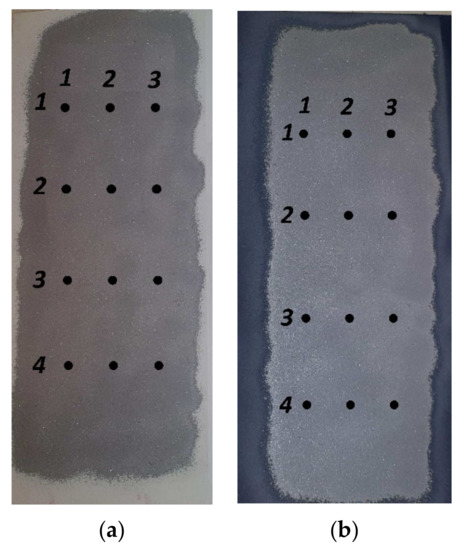
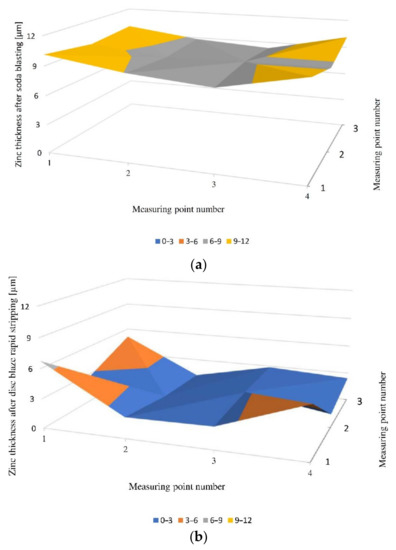
The highest thickness of the zinc coating was found for soda blasting. For the sample with metallised varnish, the minimum zinc thickness was 10.64µm and the maximum was 12.74µm. For the pearlescent lacquer, the minimum zinc thickness was 8.2µm and the maximum was 9.13µm. However, for the acrylic lacquer coating, the minimum thickness was 9.71µm and the maximum was 10.14µm. A comparison of the zinc thickness distribution for two different methods of removing the varnish layer is shown in Figure 7.
Figure 7. Zinc thickness distribution for pearl varnish after (a) soda blasting, and (b) disc blaze rapid stripping.
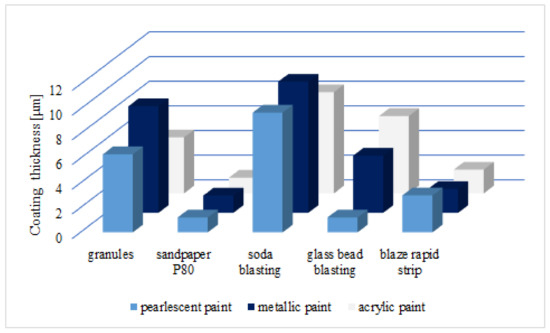
Figure 8 shows the average thickness of the measured zinc layer after different surface treatment. It can be seen from the diagram that for soda blasting and abrasive blasting with granules, the residue of the zinc coating is the highest. It may result in the best corrosion resistance of the steel after removing the varnish coat.
Figure 8. Average thickness of the zinc layer for all tested samples after varnish layer removal process.
3.3. Test of Sample Surface
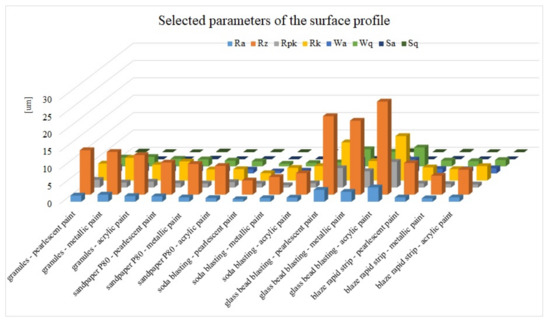
In order to better understand the surface structure after the performed varnish layer removal operations, measurements of the surface roughness profile were performed. On each sample, five areas were randomly selected for measurements of the roughness profile. Each measurement segment was 4mm long and was divided into five smaller ones, 0.8mm long. The results for this study are presented in Figure 9.
Figure 9. Results of the surface roughness profile for all samples.
The surface roughness of samples is important from the point of view of the adhesion of the coatings that will be applied in the car body renovating process. This parameter is usually determined by the manufacturers of products used in the repair phase of the motor vehicle body. In the case of most of the tested parameters of the surface roughness profile, they fall within a similar range of values. The main parameter of the profile—Ra—ranges from 0.74 to 2.05, with higher values (3.47, 2.87, 4.13) obtained for the glass blasted samples. This significant increase (more than twofold) results not only in better adhesion of the regenerative coating to the substrate but most of all the necessity to apply a thicker layer of varnish in order to even out the surface. That will affect the final quality of the regenerative coating. The Rz parameter for all tested samples ranges from 4.1 to 26.8 µm. However, for individual methods of removing the varnish coat, the values of this parameter are at a similar level. The lowest values in the range of 4.1 to 6.17µm were obtained for the soda blasting method.
On the other hand, the highest values above 21.3µm were obtained for the surface of the samples processed by the glass bead blasting. Figure 9 also includes the parameters of the surface topology (Sa and Sq). Both groups of parameters assume small values in relation to the value of the Ra parameter.
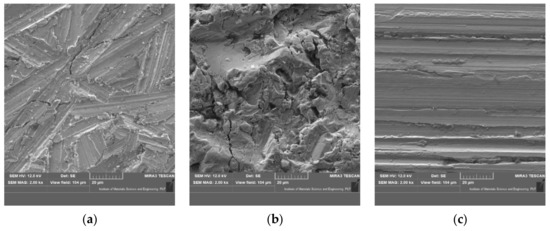
Figure 10 shows an approximation of the surface of the samples after various removal processes of the varnish layer. In the case of Figure 10a, irregular grooves are visible due to the movement of the sander with P80 sandpaper applied to it. Such surface preparation significantly interferes with the structure of the protective coatings and the steel. Nevertheless, micro-inequalities may result in better sticking of renovated coatings (better adhesion) which will affect the adhesion and durability of the joint. A similar surface preparation is shown in Figure 10c (disc blaze rapid stripping). However, the grooves in the material are larger and more regular. The most complex surface structure is seen in samples where the plastic granules were used (Figure 10b). The surface irregularities resulting from the impact of the granules will be a suitable substrate for the application of adhesive coatings.
Figure 10. View of the surface sample; (a) sandpaper P80, (b) granules, (c) blaze rapid strip.
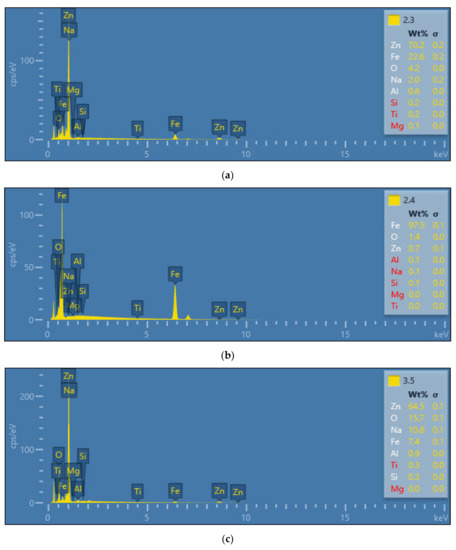
Taking into account the corrosion resistance, it is important to determine the elementary substances in the surface layer, especially zinc, which has good anti-corrosion properties. Figure 11 shows selected results of distribution of elementary substances in the surface layer for samples with granules, blaze rapid strip and the soda blasting method used. Regardless of the type of applied varnish layer, the obtained distribution of elementary substances is similar in each of the varnish layer removal methods. Only for the sample with acrylic varnish, in which the disc blaze rapid stripping was applied, was a significant increase in zinc content observed in relation to the other two samples.
This may be due to the fact that this type of surface treatment is irregular. In some places, the disc is pressed more tightly against the car body sheet and areas with a greater loss of zinc may appear. In the case of the area where assessment of the elementary substances was conducted, the disc had to be clamped less. This resulted in less interference with the surface layer and greater thickness of the zinc layer. For the most commonly used method of preparing the surface of the body sheet sandpaper treatment, small amounts of zinc were recorded in the surface layer. This may suggest significant degradation processes that occur during varnish layer removal, as well as the necessity to use additional anti-corrosion protection for steel body sheet. The highest values of zinc at the level of 58.7% to 78.7% were recorded for the surface of the samples where the varnish was removed by soda blasting and with the use of plastic granules. The highest values of the Fe elementary substances were recorded for the most invasive methods of removing the varnish, i.e., treatment with P80 sandpaper, disc blaze rapid stripping and glass bead blasting. Such a significant share of this element in the surface layer suggests that the zinc layer protecting the steel against corrosion has been completely removed.
Figure 11. Content of elementary substances after removing the lacquer; (a) granules, (b) blaze rapid strip, (c) soda.
The results of the tests in the form of surface pictures of the areas most exposed to corrosion after a two-hour exposure to salt spray are summarised in Table 1. Based on the pictures, it should be stated that for the areas prepared with soda blasting and plastic granules, no corrosion changes were observed on the surface of the samples. This is due to the high zinc appearance in the surface layer and thus better protection of the steel against corrosion.
Table 2. View of the surface samples after the test in salt spray chamber.
The above pictures are presented in such a way as to estimate the percentage share of areas where corrosion appeared. Thanks to this, it was possible to determine the degree of corrosion of the car body sheet surface. The estimated results of the area of the sheet exposed to corrosion expressed as a percentage of the total area of the sample are presented in Table 2: Percentage of the area affected by corrosion in relation to the entire test area.

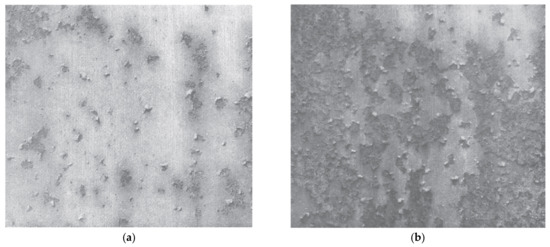
The results from the table can be compared to the PN-EN ISO 4628-1 and PN-EN ISO 4628-3 standards, which include both pictures of corroded surfaces as well as the table defining the percentage of the corroded surface and the assigned degree of corrosion. Taking into account the obtained pictures, it should be stated that for the removal of the varnish layer using the P80 abrasive paper, glass bead blasting and disc blaze rapid stripping the degree of surface corrosion is Ri4 or Ri5. That means a significant lack of protection against corrosion due to the method of removing the varnish layer. A view of the Ri4 and Ri5 surface corrosion from PN-EN ISO 4628-3 standards is shown in Figure 12.
Figure 12. View of the Ri4 (a) and Ri5 (b) surface corrosion from PN-EN ISO 4628-3 standards.
Prosek et al. performed corrosion resistance tests of car body sheets in accordance with the ECC1 test and presented the results in the form of the mass loss of samples as well as pictures of the degree of corrosion of the surface of steel samples, which are similar to those presented above. Cross-sectional pictures, which are formed during the corrosion process on steel covered with varnish and partially with a layer protecting the body sheet, are included in the publication. When referring this picture to the research contained in the article, it can be concluded that a significant reduction in the thickness of the zinc coating (as was the case with grinding with P80 sandpaper, glass bead blasting and disc blaze rapid stripping of the surface) may cause corrosion under the paint layer during vehicle operation.
Based on the observation of the corroded surfaces of the samples, it was found that surface corrosion occurred and manifested itself as surface pitting or peeling. If the samples were exposed to a longer exposure to the salt spray chamber, the surface corrosion would turn into pitting corrosion. Pitting nucleation on the metal surface is the first stage of pitting corrosion. Due to the manual removal of the varnish, the remaining zinc coating had a heterogeneous thickness. As a result, in places with a thinner zinc layer (or its absence) for samples where the varnish was removed by sandpaper grinding, glass blasting and disc blaze rapid stripping, pitting nucleation occurred. Choi et al. tested the corrosion resistance of car parts and found that rust pits have linear growth over time after a certain incubation period. This incubation period was initiated on the test samples after just two hours of exposure to salt spray and at a later stage develops into pitting corrosion. A thicker and tighter layer of zinc coating for the other two groups of samples (soda blasting and abrasive blasting with granules) resulted in no pitting nucleation on surface samples.
4. Conclusions
The article presents various methods of surface preparation and removal of the old (damaged) varnish layer in a car body shop and the influence of these methods on the corrosion resistance of the car body sheet. One of the methods of surface preparation was the standard method of sanding the surface of metal sheets with P80 sandpaper. This method is mainly used by automotive painters. Among other particularly innovative methods, soda blasting and abrasive blasting with granules made of plastic were used. All tests were carried out to determine the best method of preparing the surface of the car body sheet, especially in terms of preserving the largest zinc layer protecting the steel against corrosion. Based on the research, the following conclusions can be drawn:
-
The type of varnish layer made in factory conditions (pearlescent, metallic, acrylic) does not significantly affect the thickness and distribution of the zinc layer which during the vehicle body renovating process depends on the varnish layer removal method;
-
Among the varnish removal methods used at the research stage, soda blasting and abrasive blasting with plastic granules are the least invasive to the zinc coating that protects steel against corrosion;
-
The distribution of the zinc coating thickness for the prepared samples varied due to the nature of the varnish removal methods;
-
Accelerated tests in a salt spray chamber confirmed the effectiveness of corrosion protection of samples in which the varnish was removed using the soda blasting and for abrasive blasting with plastic granules, no corrosion places were found on the samples;
-
The standard method of removing the varnish layer in car body repair workshops (the use of sandpaper) causes a significant minimization of the zinc layer thickness, which also means that the corrosion resistance of the sheet is low. The degree of corrosion of the surface in the salt spray test was determined in accordance with the standard on Ri 5.
The results of the conducted research make it possible to propose a solution to a significant technological problem, which is the appropriate protection of the body of a motor vehicle exposed to corrosion after varnish layer renovation. Removing a damaged varnish layer with sandpaper should be replaced with other, more innovative methods such as abrasive blasting with plastic granules. However, the cost of each method presented in the article is similar and does not significantly change the total repair cost of a car body. Further research directions in the area of car body and varnish layer repairs should include:
-
Removing the varnish layer using various methods (e.g., as proposed in the article), then applying a primer and testing the degree of corrosion of a car body sheet in a salt spray chamber with a primer coating applied;
-
Evaluation of the adhesion of the primer coating applied to the surface of a car body sheet prepared with various methods used in the tests presented in this article.

